 Download als PDF File
Sophos finally listened to their customers and release a tool to overcome the limitations of group support with their Sophos Connect VPN client.
what’s the deal?
currently, with V18.0 GA and all previous versions, it is not possible to permit Sophos Connect VPN Access by a group. As you can see here:

This is a major issue because it requires administrator intervention on the firewall if new users are created within the AD.
Group supported was requested by customers and partner since the very first release of the sophos connect client.
But for some reason, it is not possible for sophos to add this features because
Quote Sophos PM:
“it would require a lot of recoding of the way user authentication is handled internally”.
At least they now released a non-supported tool which you can download from their community forum
Reply to Sophos Connect: Syncing AD User Groups
Instructions: community.sophos.com/…/VPNSync-Usage-guide.pdf
VPN sync utility: community.sophos.com/…/vpnsync.zip
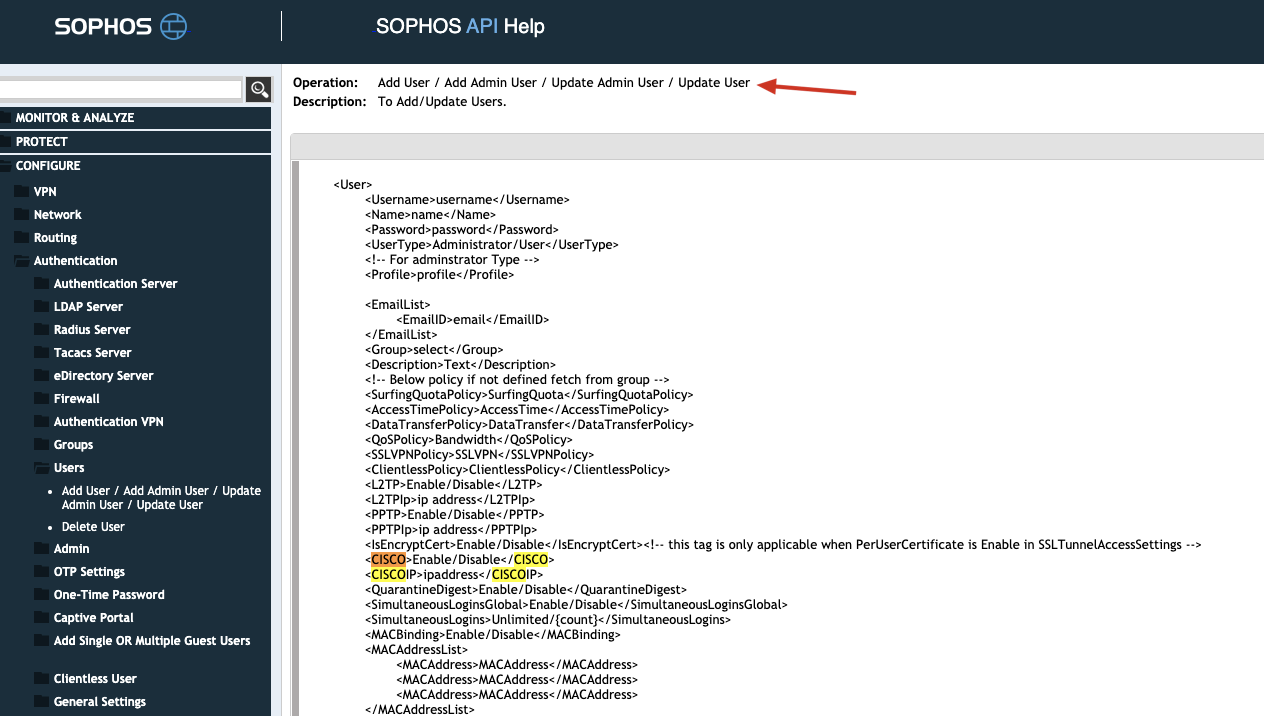
which leverages rest API to sync users from an AD Group and permit them to use Sophos Connect VPN.
So how does it work:
Warning: If your users are using SSLVPN, make sure you read to the end, since this tutorial will delete your users X509 certificates.
Activate RestAP and add IP of RestClient, running the vpnsync.exe

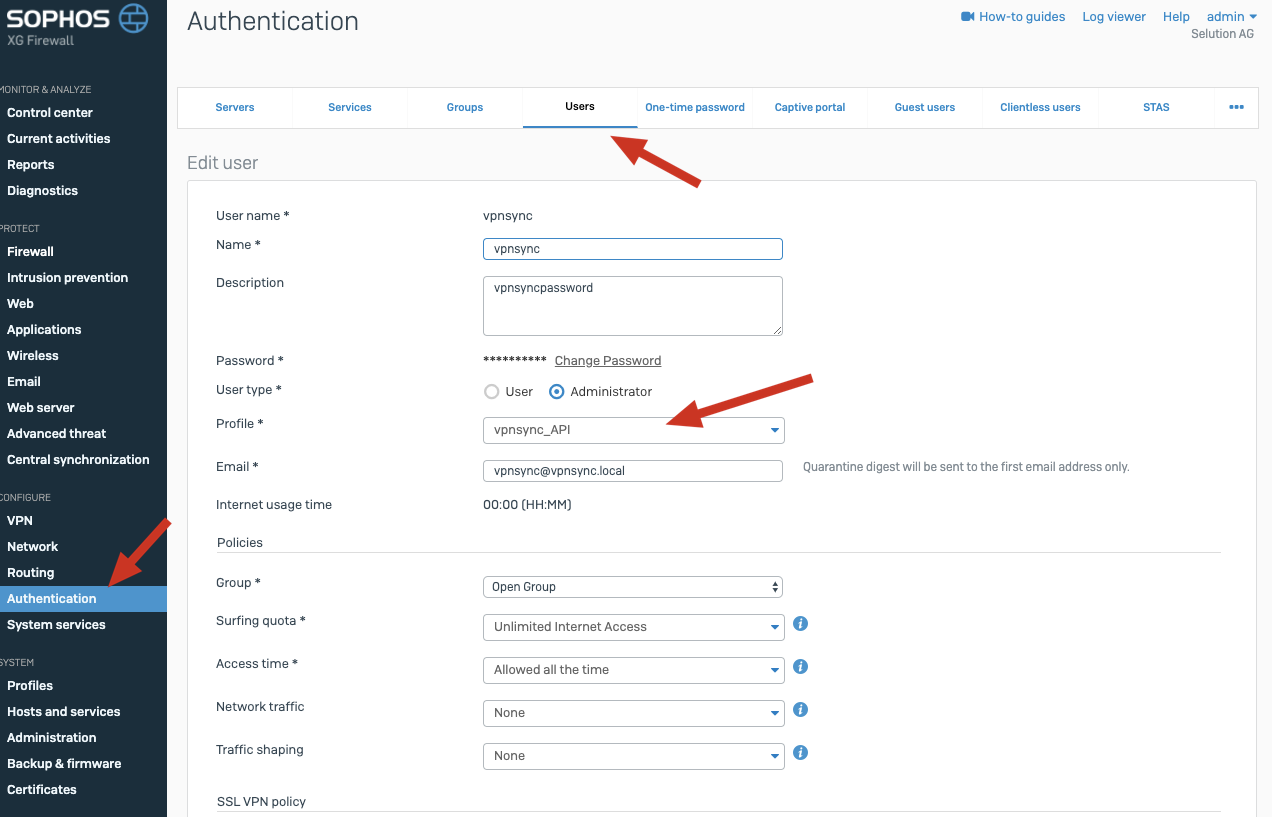
Create a Access Profile which restricts the RestAPI User to only Add Users (optionally, but highly recommended)

Now create a RestAPI User and make sure you set the profile to the previously created RestAPI Profile
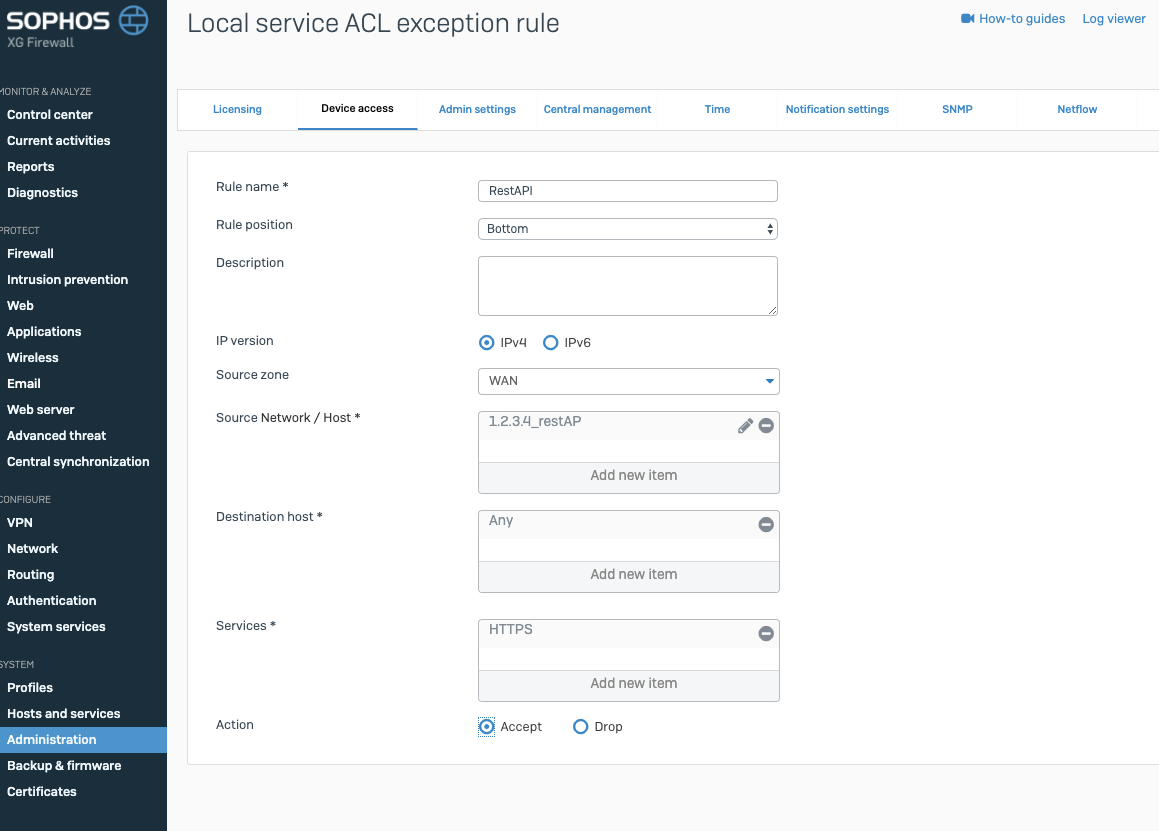
Make sure the client running vpnsync.exe is able to access the https://ip:4444 by allowing https from the Zone the client is connected.

Optionally create an exception if the client is coming from a zone which should not have access to the webadmin Port
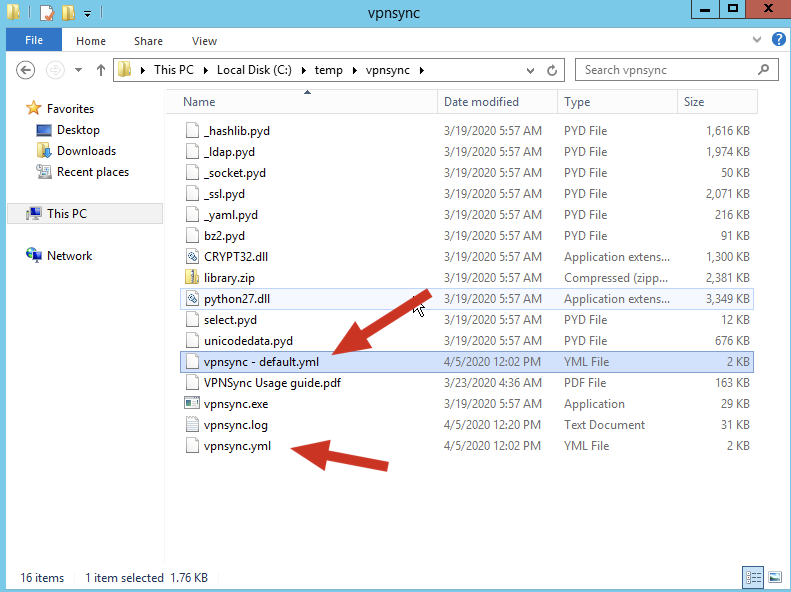
Now downlaod and extract the vpnsync.zip file on you windows machine. There is no installation required. In my case i’ll use the domain controller for the sake of simplicity, but since the tool will connect to the AD via LDAP (LDAPS currently not supported) you can basically use any machine in your environment, as long as it is able to connect to the AD.
First create a copy of vpnsync – default.yml and name it “vpnsync.yml“
This step is important, as the name of the config file is hardcoded in the vpnsync.exe
Now modify the vpnsync.yml to match the settings of your environment

1) RestAPI User Credentials which you created on the XG Firewall
2) URL of you XG Firewall, just edit IP Address and leave the rest as is
3) Remove # from either 1500.1 (Pre V18) or 1800.1 (Post V18)
4) IP of your Active Directory Server
5) Account for LDAP Queries. Note: Admin Privileges are not required, a simple Service account is fine
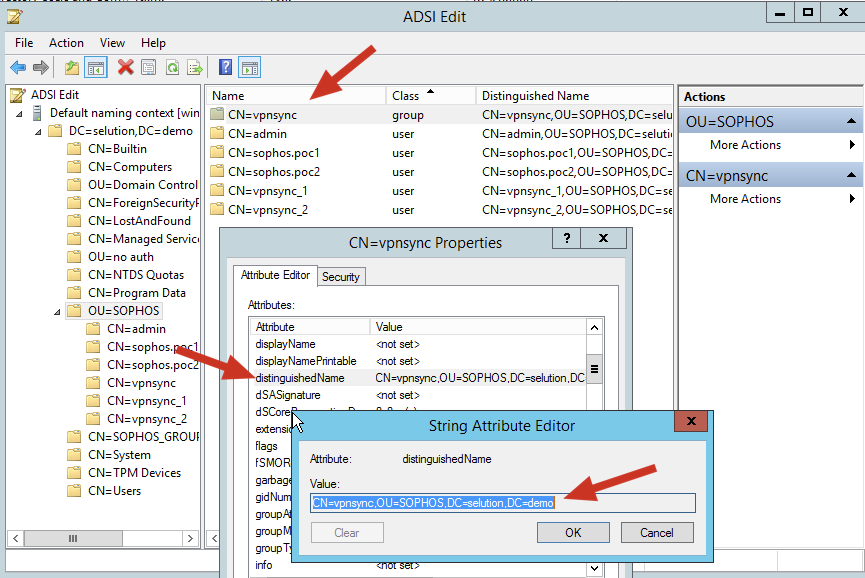
6) LDAP Bind of your AD. in my case its selution.demo which translates to –> DC=selution, DC=demo
Now for step 7 you need to match the Security Group which you want to use for Sophos Connect VPN Access. It’s not possible to Link an Organisation Unit (OU) and also the tool does not support nested groups (group in a group)
In my case i’m going to use a newly created group
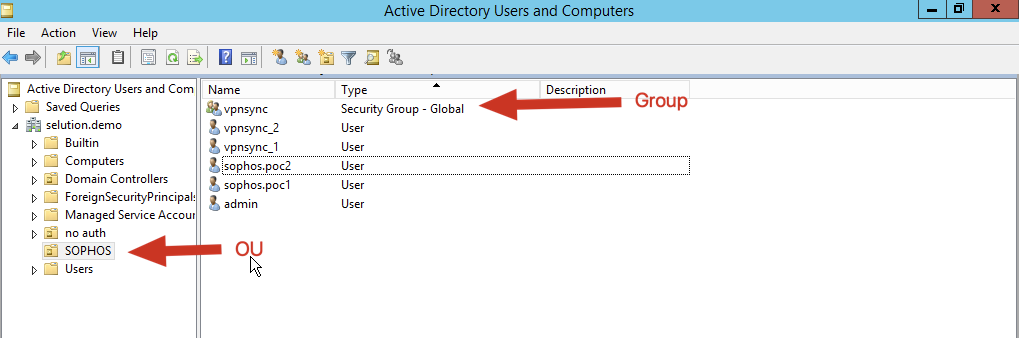
The easiest way to find out LDAP Strings of a given group is to use the ADSI Editor:
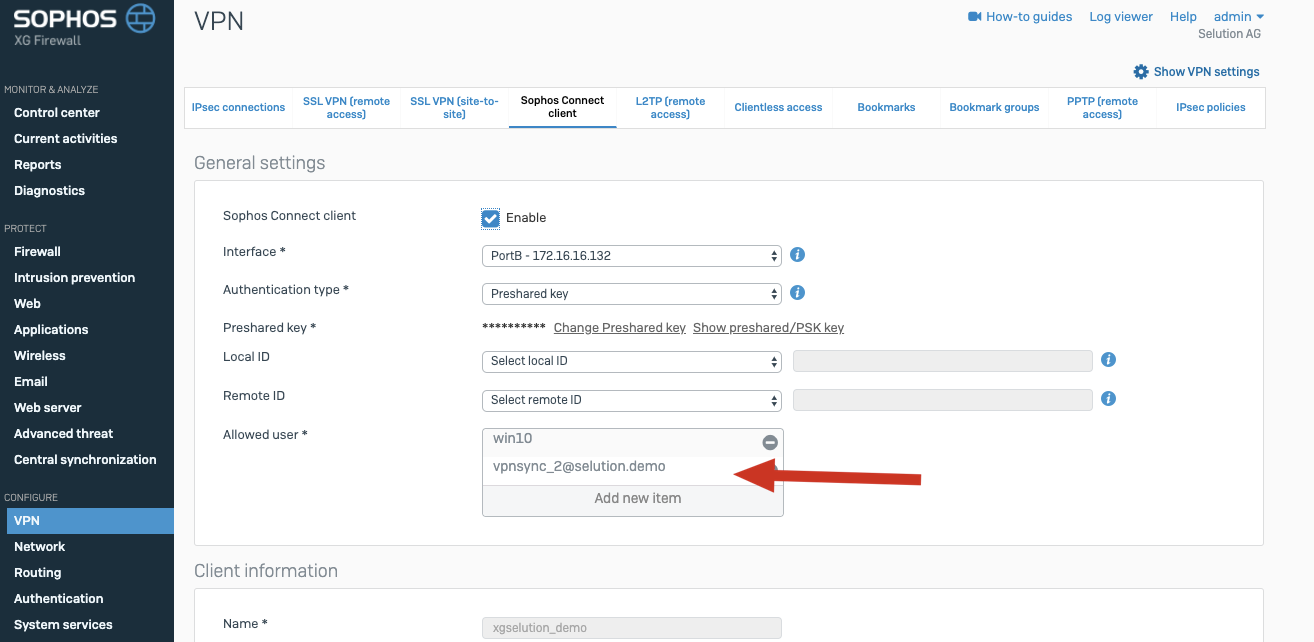
Now before you go ahead an test, make sure Sophos Connect VPN is enabled on the firewall

Now you are ready to Test.
Since to Group is still empty i’m going to add two testusers to the gorup:
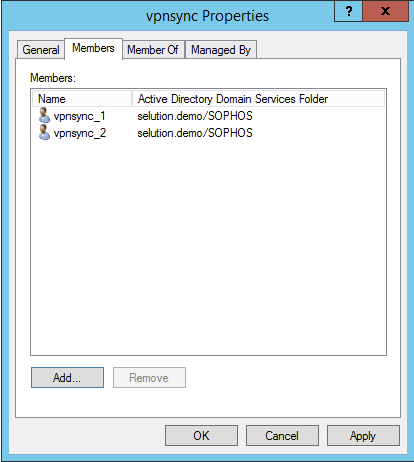
Please note that
vpnsync_1 does already exist on the firewall
vpnsync_2 does not exist
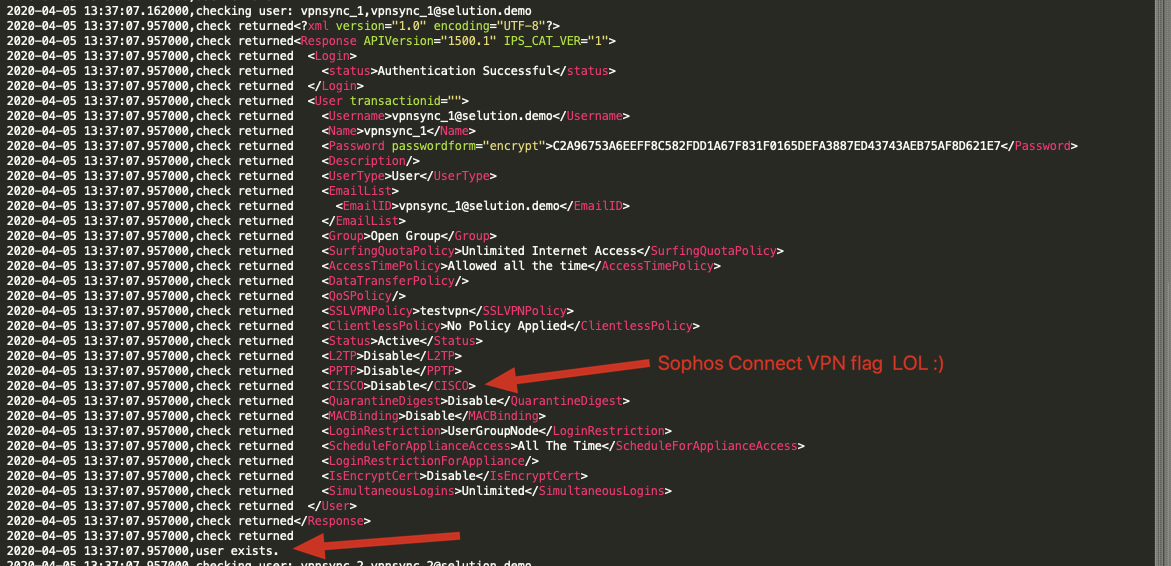
Now run the script:

if you see this output, chances are good it worked.
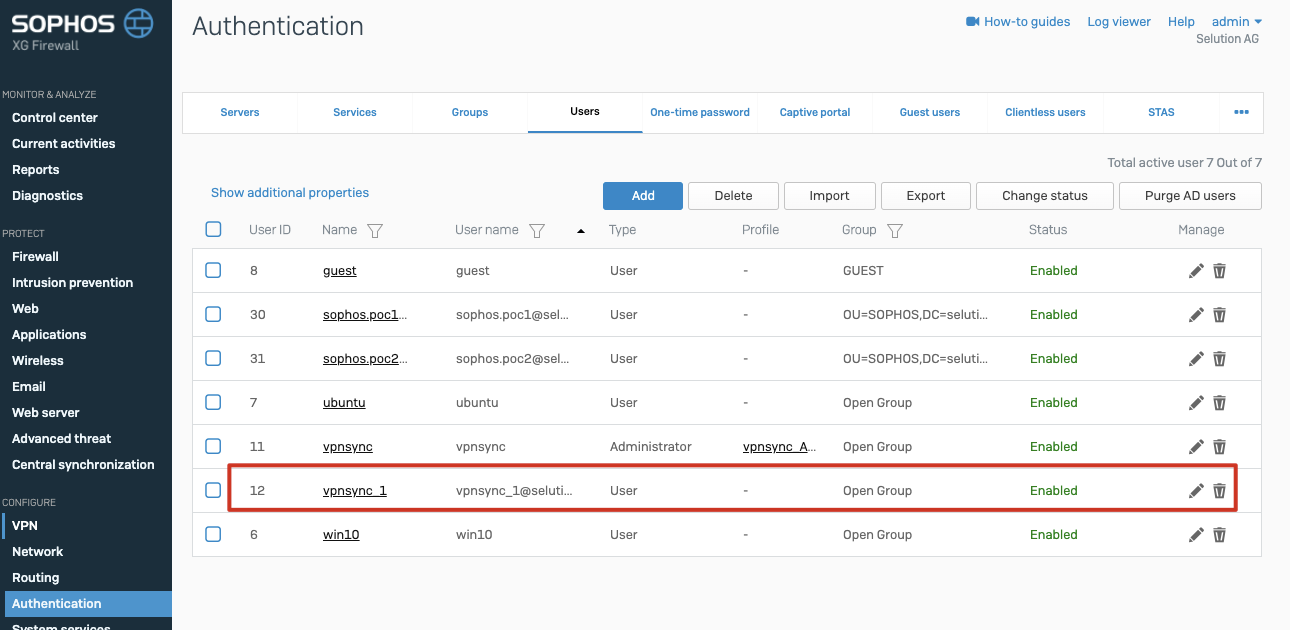
Refresh the user page on the XG:
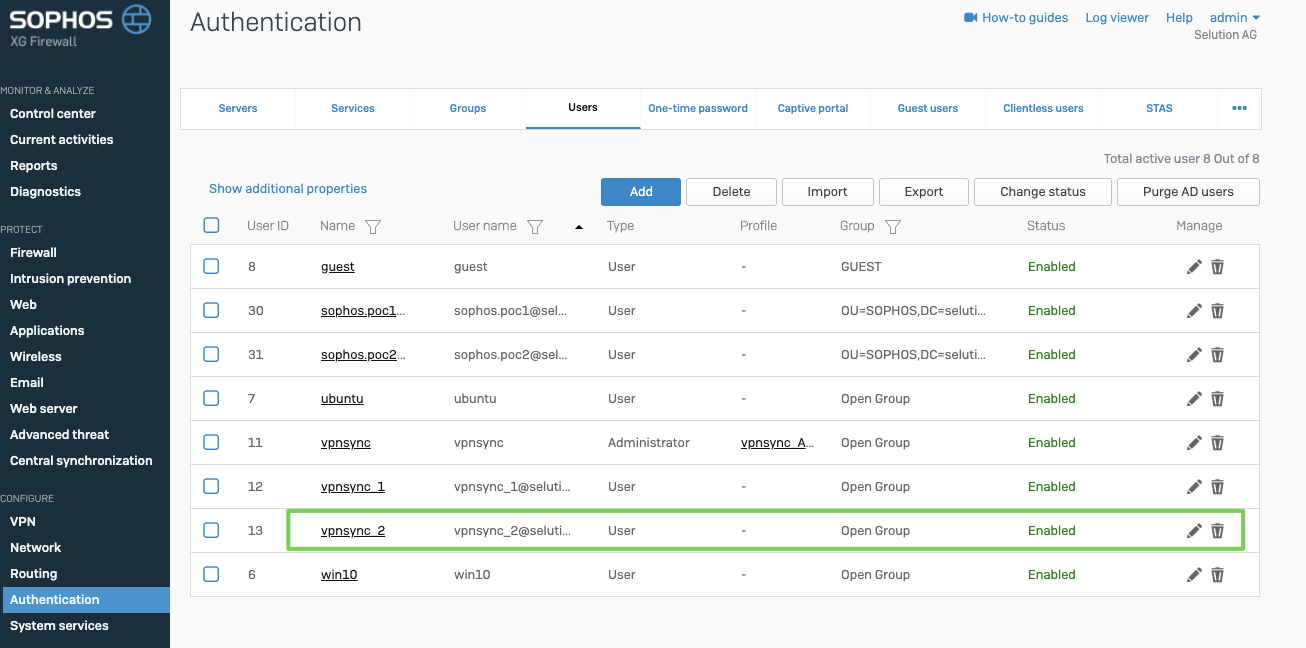
Unfortunately the tool only permitted the newly created user “vpnsync_2” and did not modify existing user “vpnsync_1”
You can see this in the vpnsync.log
If Disabled means that Sophos Connect was not permitted.
The only way to overcome this is to delete the users first and then rerun the script again.
To automate VPN Sync Guides mentioned to use Windows Task Scheduler. Which looks pretty straight forward.
Scheduling
This script does not install and auto-start, or run as a service. It must be scheduled using an application such as the windows task scheduler. When using the windows task scheduler, it is recommended to keep the recurrence to the minimum amount necessary (Daily is recommended). If a large number of users are created at one time, it may put unexpected load on your firewall. Task Scheduler will ask you to supply a user account to run the task. A privileged user is not needed, only a domain account with permission to list users is needed. It is recommended to create an account specifically for this task, and to set the permissions of any folders that vpnsync.yml files are located in to be accessible by only select users, including the user created to execute the commands, as the yml files will contain username and password information, for both the firewall and your AD environment.
How to schedule using Task Scheduler:
On the server you’ve chosen to run the script, click Start, then begin typing Task Scheduler. When you see the Task Scheduler application presented, launch it
Click on the Task Scheduler Library
Click Create Task
On the General tab, click Change User or Group, and select the user created for this task
Select Run whether user is logged in or not
On the Triggers tab, add a new trigger
Set the schedule to Daily
Set the desired start time
Optionally, for more frequent updates, select Repeat task every and choose a more frequent
time interval
Click OK to save the trigger
On the Actions tab, add a new Action
Select Start a program, then in the program/script field, browse for the location of vpnsync.exe
If you are syncing multiple groups with multiple yml config files, enter the path of the first one in
the Start in field
Click OK to save the Action
Click OK to save the task
Select the task in the list, and select Run, to test that the task is functioning correctly, and view
the vpnsync.log file in the same folder as the vpnsync.yml file.
With this method, it should also be possible to run multiple instances of this tool, in case you need to sync more than one group.
Limitations:
Vpnsync does not support nested user groups. Only direct members of the chosen AD group will be synchronized.
• Users removed from the AD group will not be removed from Sophos Connect access rights on XG, though disabled or deleted AD users will no longer be able to connect
• Only one group may be specified in the vpnconfig.yml file
• The filename vpnconfig.yml is hardcoded, and cannot be named differently
• The vpnconfig.yml file is expected to reside in the present working directory, when vpnsync.exe
is executed
• Synchronizing multiple groups is possible, but requires separate vpnconfig.yml files to be located in separate directories, and when executed, that the working directory for vpnconfig.exe be set to the location of the selected config file.
• Vpnsync does not come with any support or warranty. It is provided as-is, and free of charge. If you require support in using this utility, it is recommended that you consult with other Sophos users on the Sophos Community Forums.
Conclusion:
Let’s be honest. It’s a bit of a nasty workaround and only provides you the minimum to overcome the group limitation. It requires you to delete all existing users, which is a major issue if you already rolled out SSLVPN, since deleting a user also deletes its x509 certificated.
Also the lack of LDAPS Support could be a problem in the future since microsoft is going to remove LDAP by mid-2020
It would have been cool if you can update existing users, without deleting them.
Technically this is possible since there is a “update” function provided by the API: